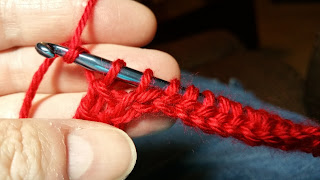
Tunisian crochet works in rows rather than individual stitches. Each row has a forward pass and a return pass (also known as closing)… and your stitches are not complete until you’ve made both passes. All rows are worked on the Right Side and there is no turning. Pretty crazy, right?
We’ll be able to go through it in detail over the next few tutorials, and soon your hooks will be flying! Speaking of hooks… traditional Tunisian Crochet requires a longer hook because loops created in the forward pass will remain on the hook until the return pass it completed.
They come in several different styles, afghan hooks, double ended hooks, stoppered, straight and corded. For our purposes of stitch practice, any style will work!
In regular crochet, hook size depends on the yarn and is usually outlined on the yarn label. In Tunisian crochet, that label is a starting point. I usually go up two sizes from the label for my Tunisian projects.
Just like regular crochet, Tunisian crochet has a few basic stitches that are the most commonly used:
Simple Stitch is single crochet inserted behind the front loop of the stitch below
Reverse Stitch is the same thing worked under the back loop of the stitch below
Double Stitch is simple stitch beginning with a yarn over, just like regular doubles
Knit Stitch is where the hook is inserted through the loop to the back.
Purl Stitch is simple stitch with the working yarn held in front.
There are other more complicated stitch patterns, but we'll cover them later.
All projects begin with a Foundation - a chain determined by the pattern.
Foundation/forward pass - insert hook into second chain, yarn over and pull up a loop.
Repeat for each remaining chain.
I like to use the back ridge loop of the chain to leave a nice teardrop shaped edge on the bottom. Do not turn!
Once you reach the end of your chain it's time for the Return Pass.
Unless specifically directed otherwise, all return passes are worked in the same way.
Return/closing pass - All return passes begin with a chain one. The rest of the return pass removes two loops at a time.
Chain 1 though the last loop on your hook only - i.e. your loop count won’t change.
(Yarn Over (YO) and pull through two loops) repeat across until there is only one loop remaining. Do not turn!
One completed foundation row!
From here loops are pulled under those vertical bars. The different stitch types are determined by how you insert the hook into or around those vertical bars - just like regular crochet depends on the teardrop shaped loops on the top of each stitch.
Once you've completed your pattern you're ready to finish or bind off. There is a standard method for this as well, unless your pattern specifically directs otherwise.
See the little bit of space in between stitches after a return pass? We need to finish working those loops.
The simplest way to finish is to switch to traditional crochet and slip stitch across. Insert your hook under the second vertical bar and pull up a loop all the way through the original loop on your hook.
Repeat for each vertical bar across (including the chain one at the end of the row) and fasten off.
Clear as mud? Here... let me show you!


No comments:
Post a Comment