Thursday, June 22, 2017

Tutorial - Tunisian Crochet (beginner)

Many people confuse Tunisian crocheted fabric with knitted fabric, and it's true they share some similarities.

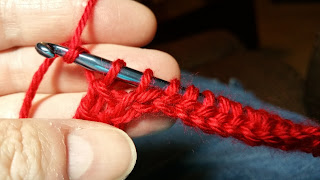
Tunisian crochet works in rows rather than individual stitches. Each row has a forward pass and a return pass (also known as closing)… and your stitches are not complete until you’ve made both passes. All rows are worked on the Right Side and there is no turning. Pretty crazy, right?

We’ll be able to go through it in detail over the next few tutorials, and soon your hooks will be flying! Speaking of hooks… traditional Tunisian Crochet requires a longer hook because loops created in the forward pass will remain on the hook until the return pass it completed.

They come in several different styles, afghan hooks, double ended hooks, stoppered, straight and corded. For our purposes of stitch practice, any style will work!

In regular crochet, hook size depends on the yarn and is usually outlined on the yarn label.  In Tunisian crochet, that label is a starting point.  I usually go up two sizes from the label for my Tunisian projects.

Just like regular crochet, Tunisian crochet has a few basic stitches that are the most commonly used:

Simple Stitch is single crochet inserted behind the front loop of the stitch below
Reverse Stitch is the same thing worked under the back loop of the stitch below
Double Stitch is simple stitch beginning with a yarn over, just like regular doubles
Knit Stitch is where the hook is inserted through the loop to the back.
Purl Stitch is simple stitch with the working yarn held in front.
There are other more complicated stitch patterns, but we'll cover them later.

All projects begin with a Foundation - a chain determined by the pattern.

Foundation/forward pass - insert hook into second chain, yarn over and pull up a loop.

Repeat for each remaining chain.

I like to use the back ridge loop of the chain to leave a nice teardrop shaped edge on the bottom. Do not turn! 


Once you reach the end of your chain it's time for the Return Pass.

Unless specifically directed otherwise, all return passes are worked in the same way.

Return/closing pass - All return passes begin with a chain one. The rest of the return pass removes two loops at a time.

Chain 1 though the last loop on your hook only - i.e. your loop count won’t change.

(Yarn Over (YO) and pull through two loops) repeat across until there is only one loop remaining. Do not turn!

One completed foundation row!

From here loops are pulled under those vertical bars.  The different stitch types are determined by how you insert the hook into or around those vertical bars - just like regular crochet depends on the teardrop shaped loops on the top of each stitch.

Once you've completed your pattern you're ready to finish or bind off.  There is a standard method for this as well, unless your pattern specifically directs otherwise.

See the little bit of space in between stitches after a return pass?  We need to finish working those loops.

The simplest way to finish is to switch to traditional crochet and slip stitch across. Insert your hook under the second vertical bar and pull up a loop all the way through the original loop on your hook.

Repeat for each vertical bar across (including the chain one at the end of the row) and fasten off.

Clear as mud?  Here... let me show you!


Tuesday, June 13, 2017

Weekend Update - CALs and Cakes


While I did finish a couple of projects since we spoke last, I'm going crazy about my blanket WIPs.  Two of the three use the new self striping cake yarns we see everywhere these days. 

Since I can't use Caron Cakes because they contain wool, I decided to find as many brands as I could to try.

Wool got me thinking about allergies, and what I have to do/organize ahead of time when we travel.. like 100% of my food. How about you?


Finished Projects:
Entwined Helix Scarf in Expression Fiber Arts Pearlescent Silk, Marmaid Tail
Beachy Sun Hat in Bernat Softee Cotton, Lavender Fields

WIPs:
Atlanticus CAL in rouge and violette - Premier Sweet Roll in Wild Cherry/Cherry and Baby Bee Sweet Delight in purples.  See the Hooked on Sunshine CAL

The Penny Drops CAL - Tunisian crochet, in Yarn Bee Sugarwheel in Go Go Cocoa, and I Love This Yarn in Coffee.

Cake yarns:
Lion Brand Mandala
Bernat Pop!
Premier Sweet Roll
Yarn Bee Sugarwheel

Socks!
Cabled Slip Stitch Socks by Anna Lindmark
In Your Shoes Ankle Socks  by Pam of Pam Crochets
Twist and Shout Socks by Lauren Irving
Sunny Citrus by Nicole Cormier

Tuesday, June 6, 2017

Tutorial - Pretty Parasols

http://www.ravelry.com/projects/jen2291?set=parasols&view=thumbnail


My crocheted parasols are conversation starters.  No matter where I go, if I have one with me someone asks how I made it and wonders in awe at the possibilities.

I know it's not that complicated to do if you are crafty minded - and now you will too!


First of all, the pattern you use depends on the umbrella frame you want to use, so decide that first. 

I went on ebay and bought a "lot" of old umbrellas from an estate sale.  They all had really interesting handles.  Some needed minor repair, and some were just used for spare parts.
Step 1: Patterns: Count how many ribs you have in  your umbrella frame.  Final assembly will be easier if you have the same number (or a multiple) of repeats in your crochet pattern.  You can find a pattern that already has the same number of repeats as your frame or you can wing it.  For example, the pattern I used for this parasol called for 12 repeats, but I only made 10.

You can use patterns specifically designed for parasols like these on  Ravelry, or any round doily pattern you like.  Try to choose one with enough open spaces to allow for some stretch. 

Step 2: Crochet: Follow your chosen patterns directions.  If you are using a doily pattern though, increase your hook size two or three sizes.  Too tight, and you're parasol will never open.

Start with a magic loop so you can adjust it during assembly.

Step 3: Measure.  Your crocheted piece should reach almost to the tips, but not quite.  You may have to get creative with your pattern to end on the row you like best.


 I had to add another repeat!
Step 4: Strip the fabric from your umbrella frame... you'll need a pair of scissors to cut the ties.  Noting where the original umbrella was tied will tell you how to tie your new fabric into place.

Start from the outer end of each rib, and move your way up to the center finial.  At the end of each rib is the tip used to tie it in to place.  Once you cut this string, the tip will probably fall off, so keep track of it.


Most umbrellas also have a loose tie halfway up the rib, which keeps the fabric from ballooning away from the frame.  Don't skip this step when attaching your new fabric.


Once the fabric is loose from the frame except for the very top, look very careful at the fabric tied under the finial.  Cutting the old fabric above that interfacing will help your frame maintain it's stability.  Leaving the interfacing there won't be visible once you tie your new fabric into place.


Step 5: Tie your new fabric to the frame, working from the top down this time.


Loosen your magic loop just enough to work the finial through and tighten into place over the existing interfacing.  Tighten and tie it off, weaving in any loose ends.


Gently lift the frame and line up each repeat of your pattern with it's associated rib.  Pay special attention in tying the same stitch of each repeat to a rib so your fabric is spread evenly across the frame.


Use a needle and thread to tie each repeat to a rib.  Wrapping it around the tip and back through the fabric and hole will make it more stable... just like sewing through a button several times.


Now it's time to carefully open up!  Rearrange your pattern repeats as necessary.  See how that interfacing works to keep the ribs in place?


Once everything is lined up, retie just below the part of the rib that opens and closes.   Use a needle and thread, tie off, and weave in any loose ends.


 A little glue in the tip of each rib helps if they seem loose!


Again, carefully open your frame, and make sure everything works without snagging or pinching. Making adjustments is easy enough, and happens to me on a regular basis so don't be shy about tweaking things.

If you like, add a tie and Victorian style tassel wrist band for carrying your parasol.  My tie is a simply one... chain the length needed to comfortable close the umbrella. Single crochet in each chain, rotate and single crochet in the opposite side of the starting chain.  Add a chain loop big enough to accommodate your button and fasten off.  Sew a button to the square end of tie.

I bought the tassel in the drapery department at my local craft store, and painted the plain wooden handle to go with the ashy gray thread.


Here's an example of a larger tie... I made a basic tie as above in pink, and then worked a row in black to match the button.


All that's left now is to make a cool drink, and find a nice spot in the park to fashionably sit in the shade!


I hope you enjoyed this peek into how to assemble a crocheted parasol, and I hope you make one soon.  If you do, let me know so I can include you in our weekly project update!

Til next time...